How does it work
Shelving System is highly adaptable. Almost anything is possible. But what does that mean? Discover what you can do, and how the system works.

Its Modular
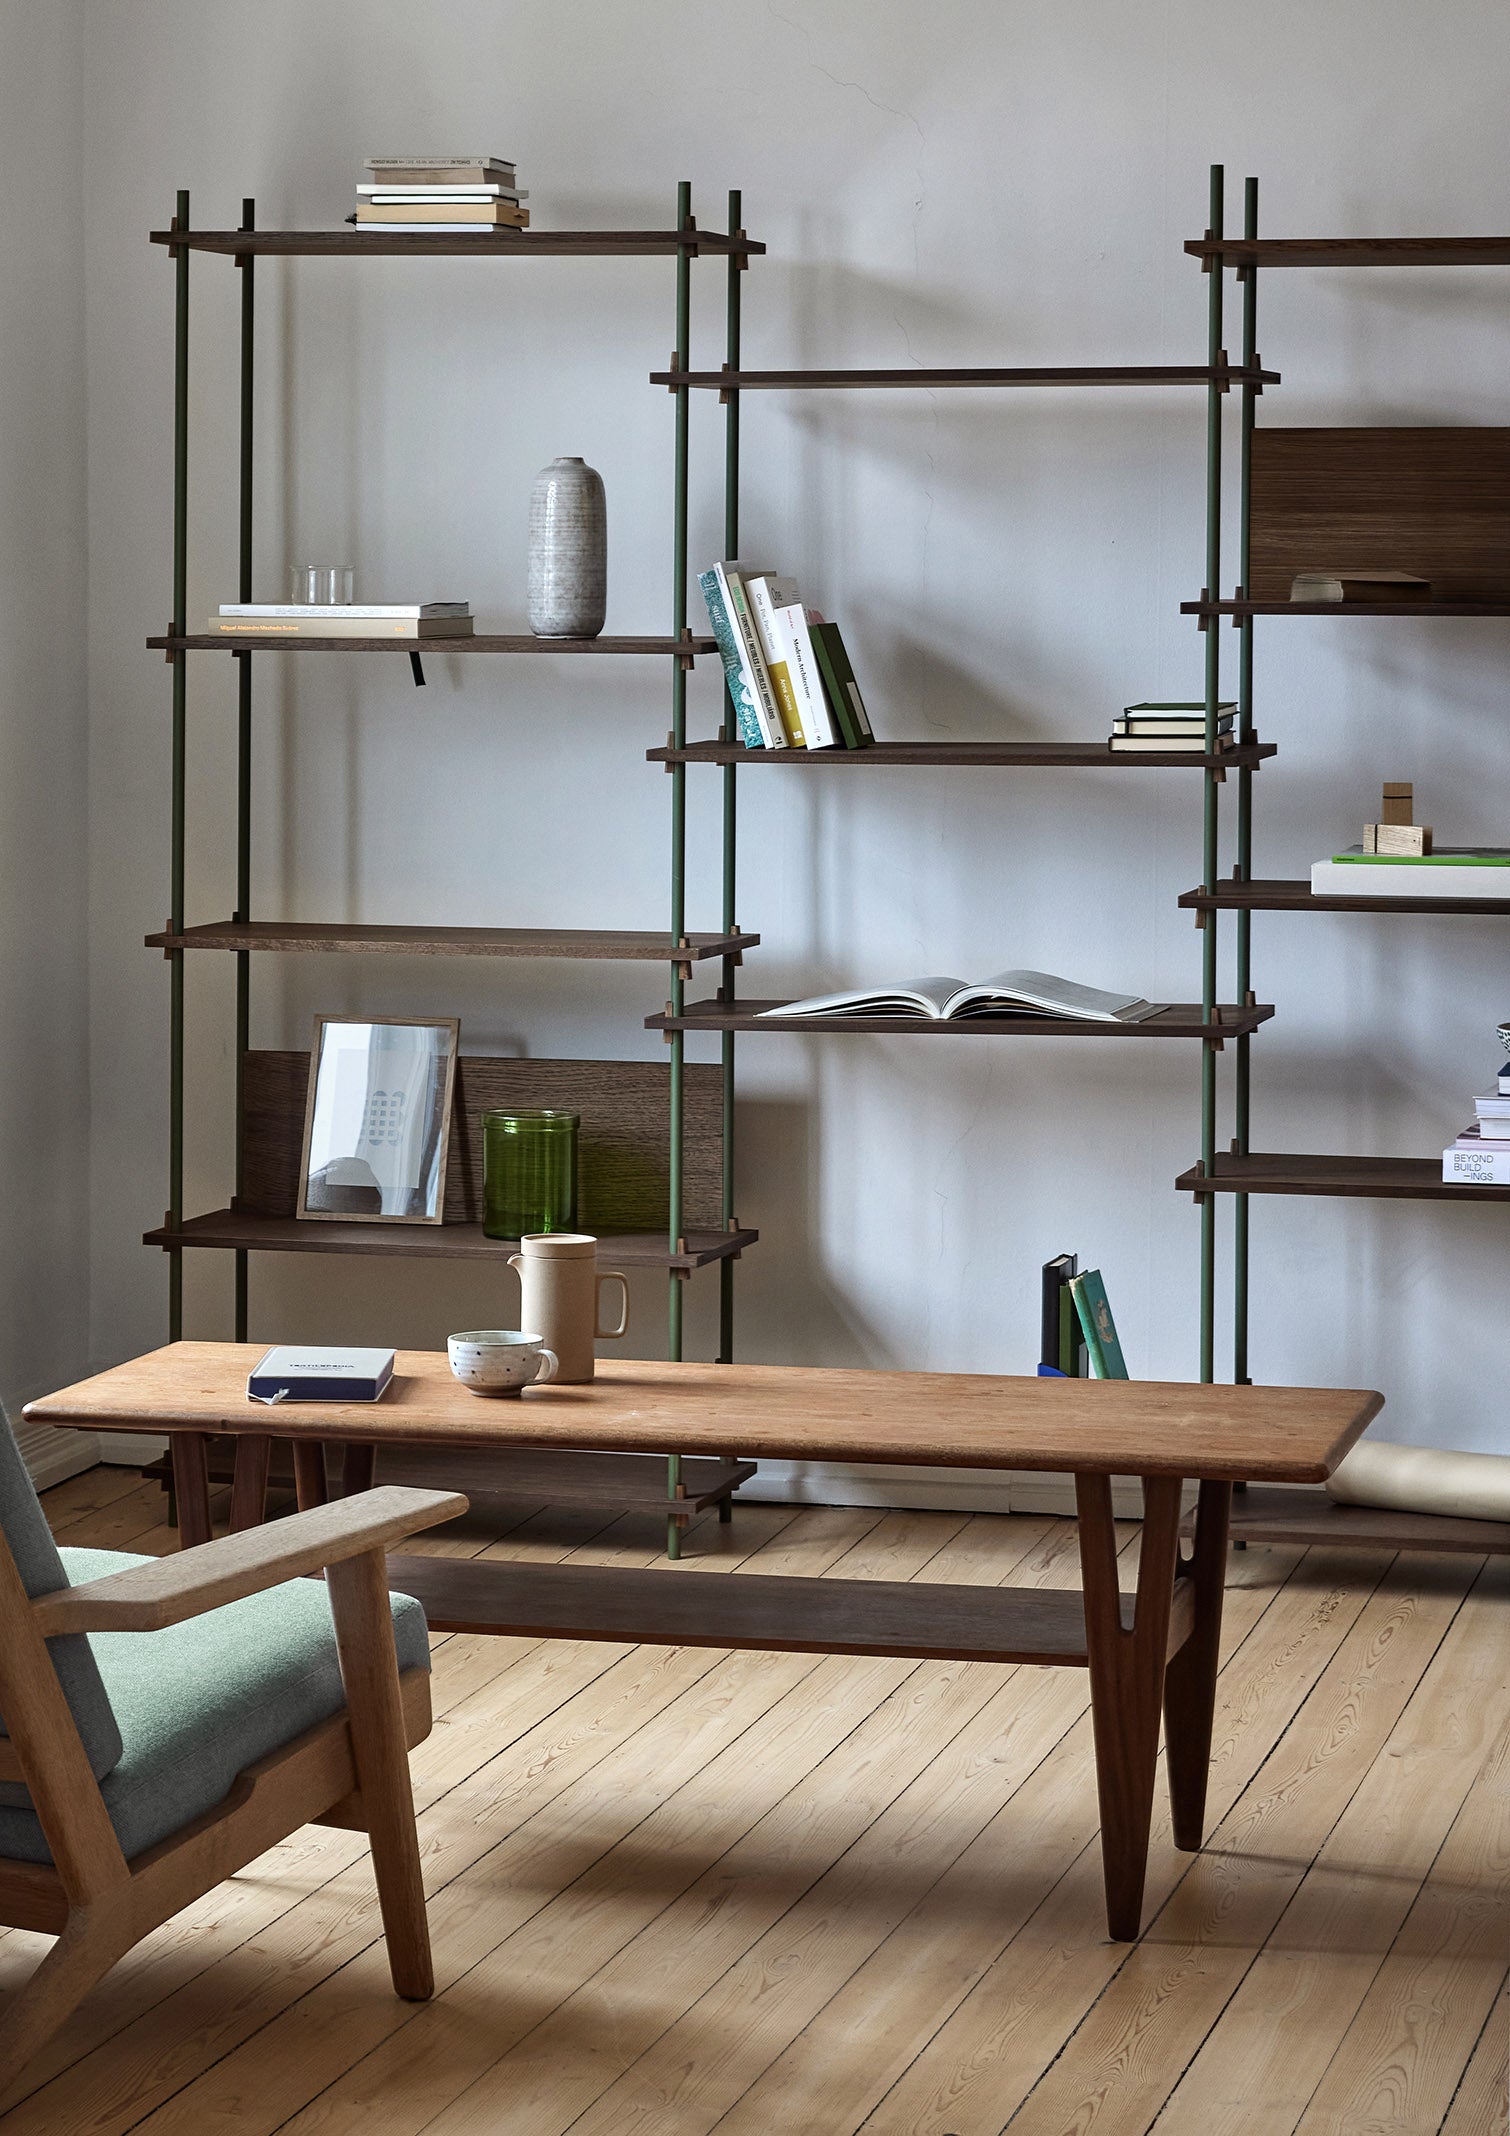
As a modular system, Shelving System is built entirely from individual parts. It can be customised and adapted again and again.

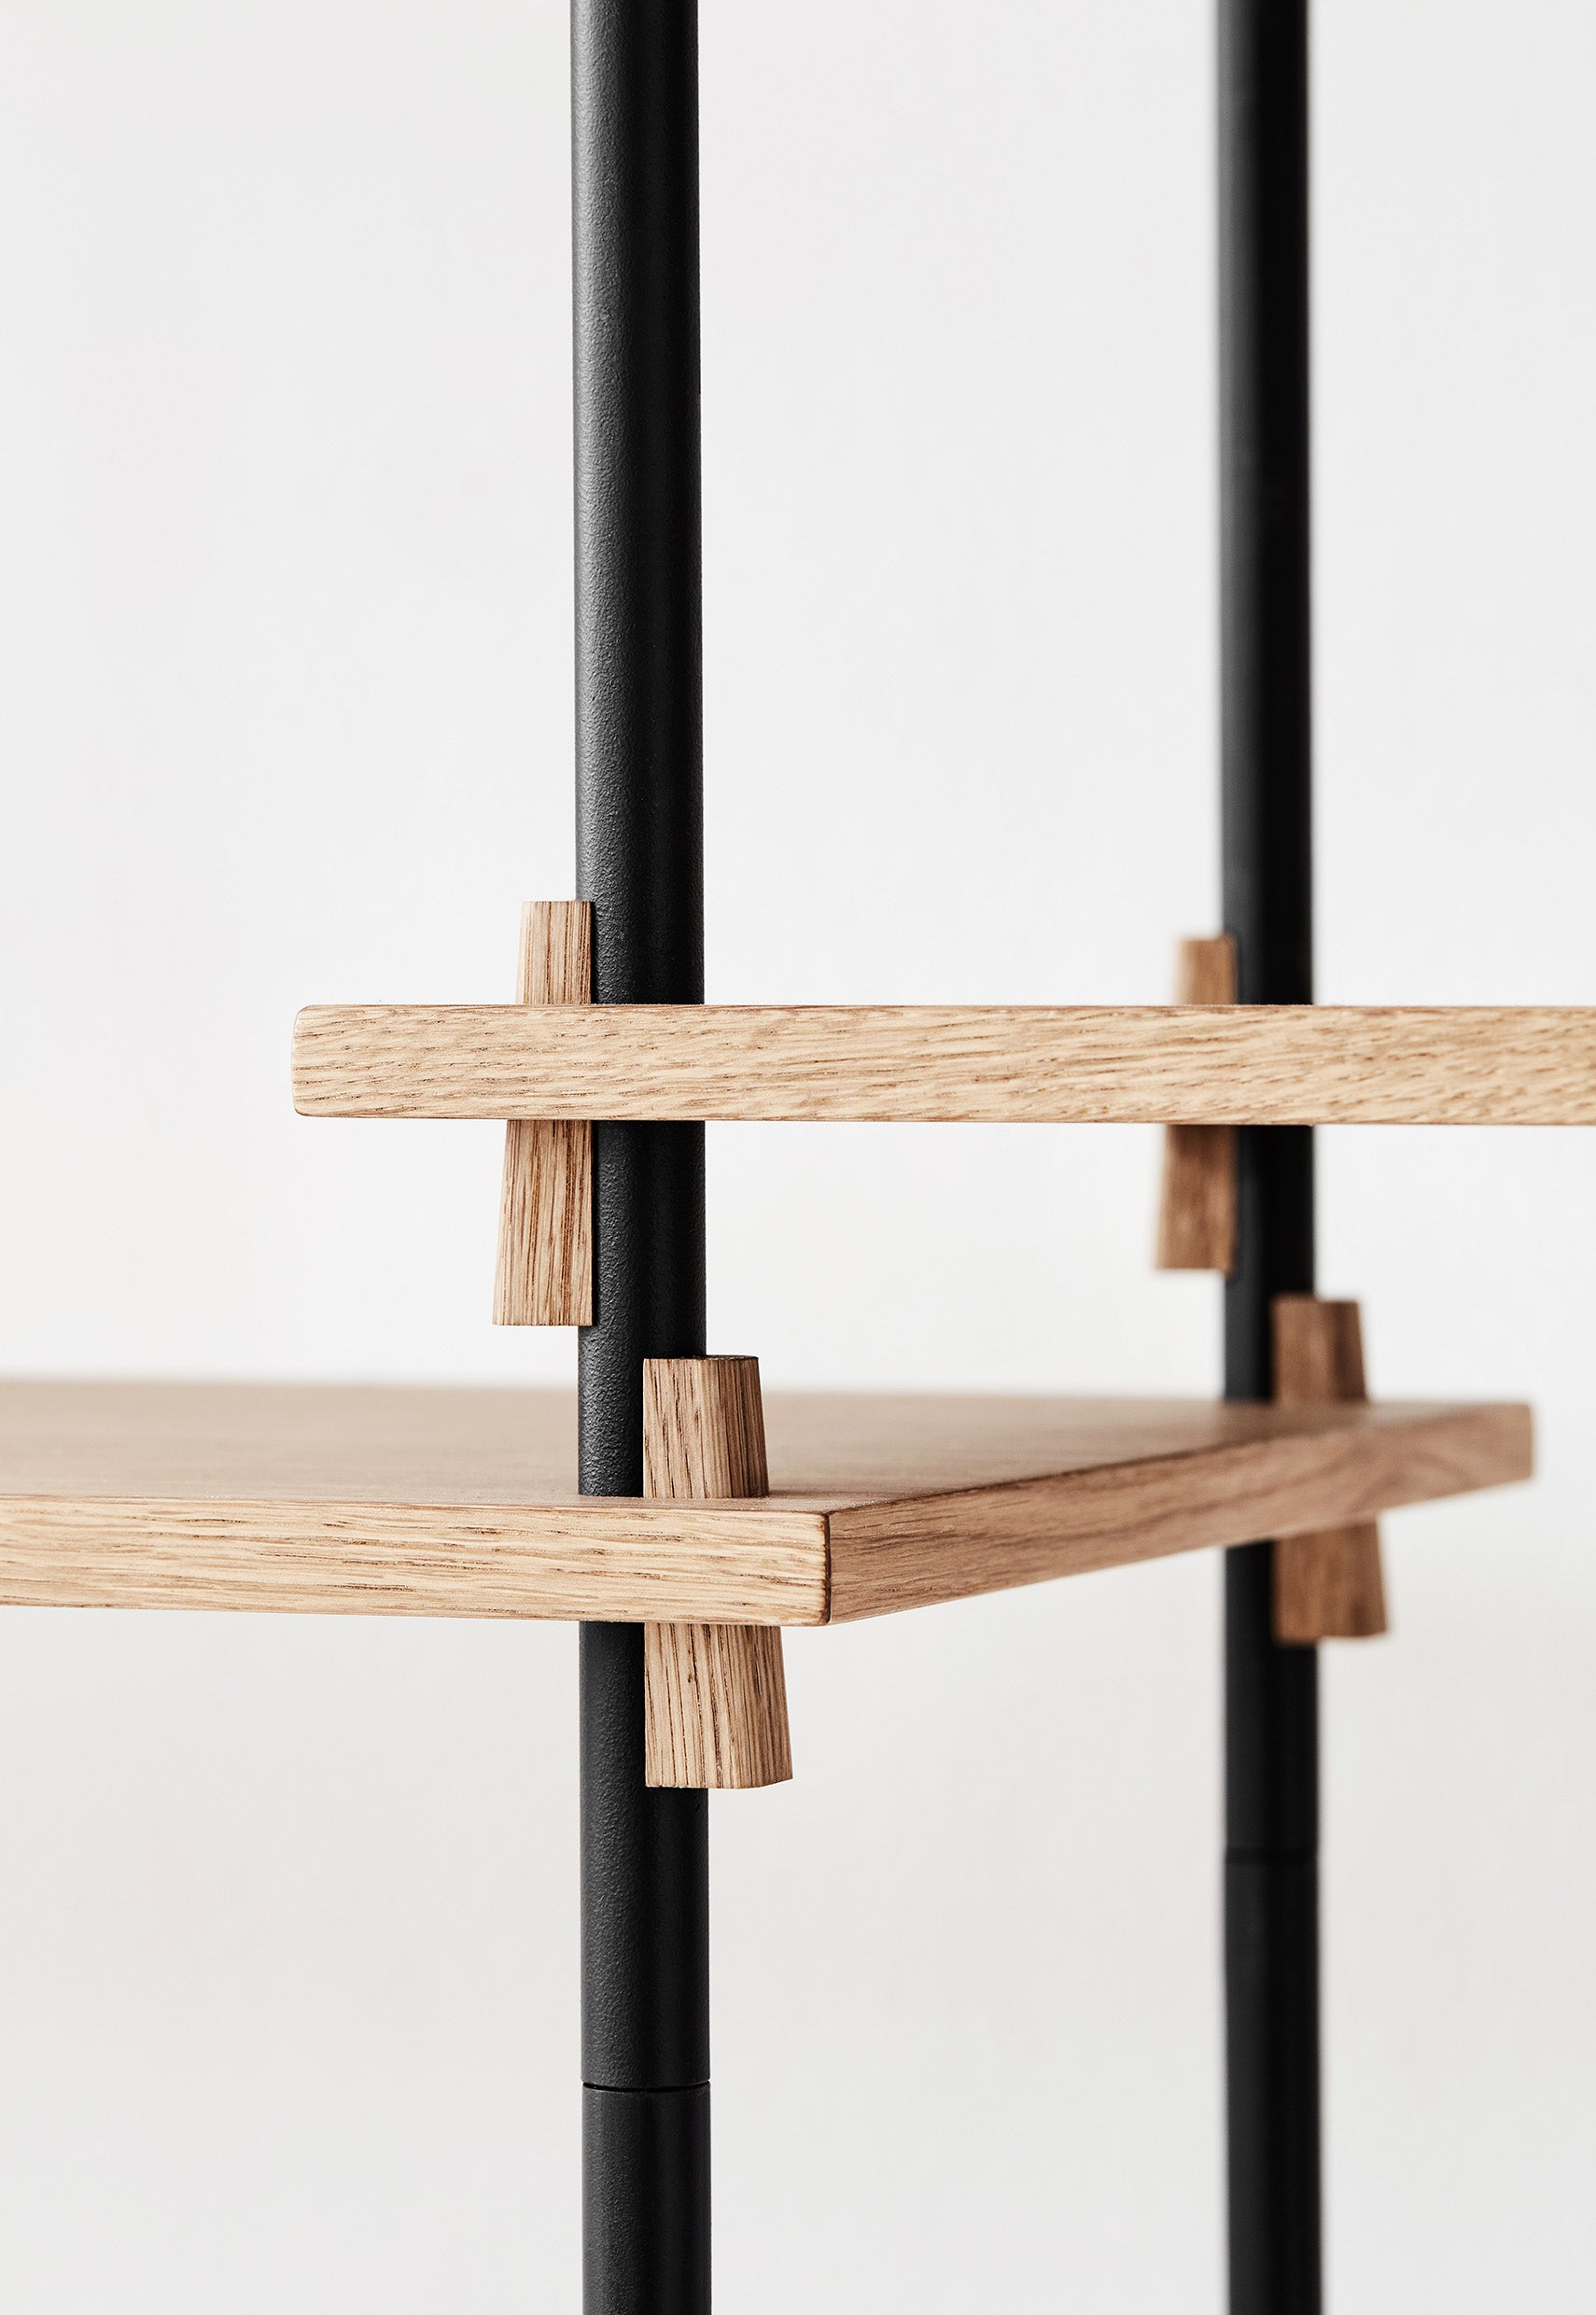
Shelves can be at any height
All shelves are held in place by 4 wedges in either corner. Using wedges means that there are no limitations on position. Simply slide the shelf to the height you want and install the wedges from below. Done.

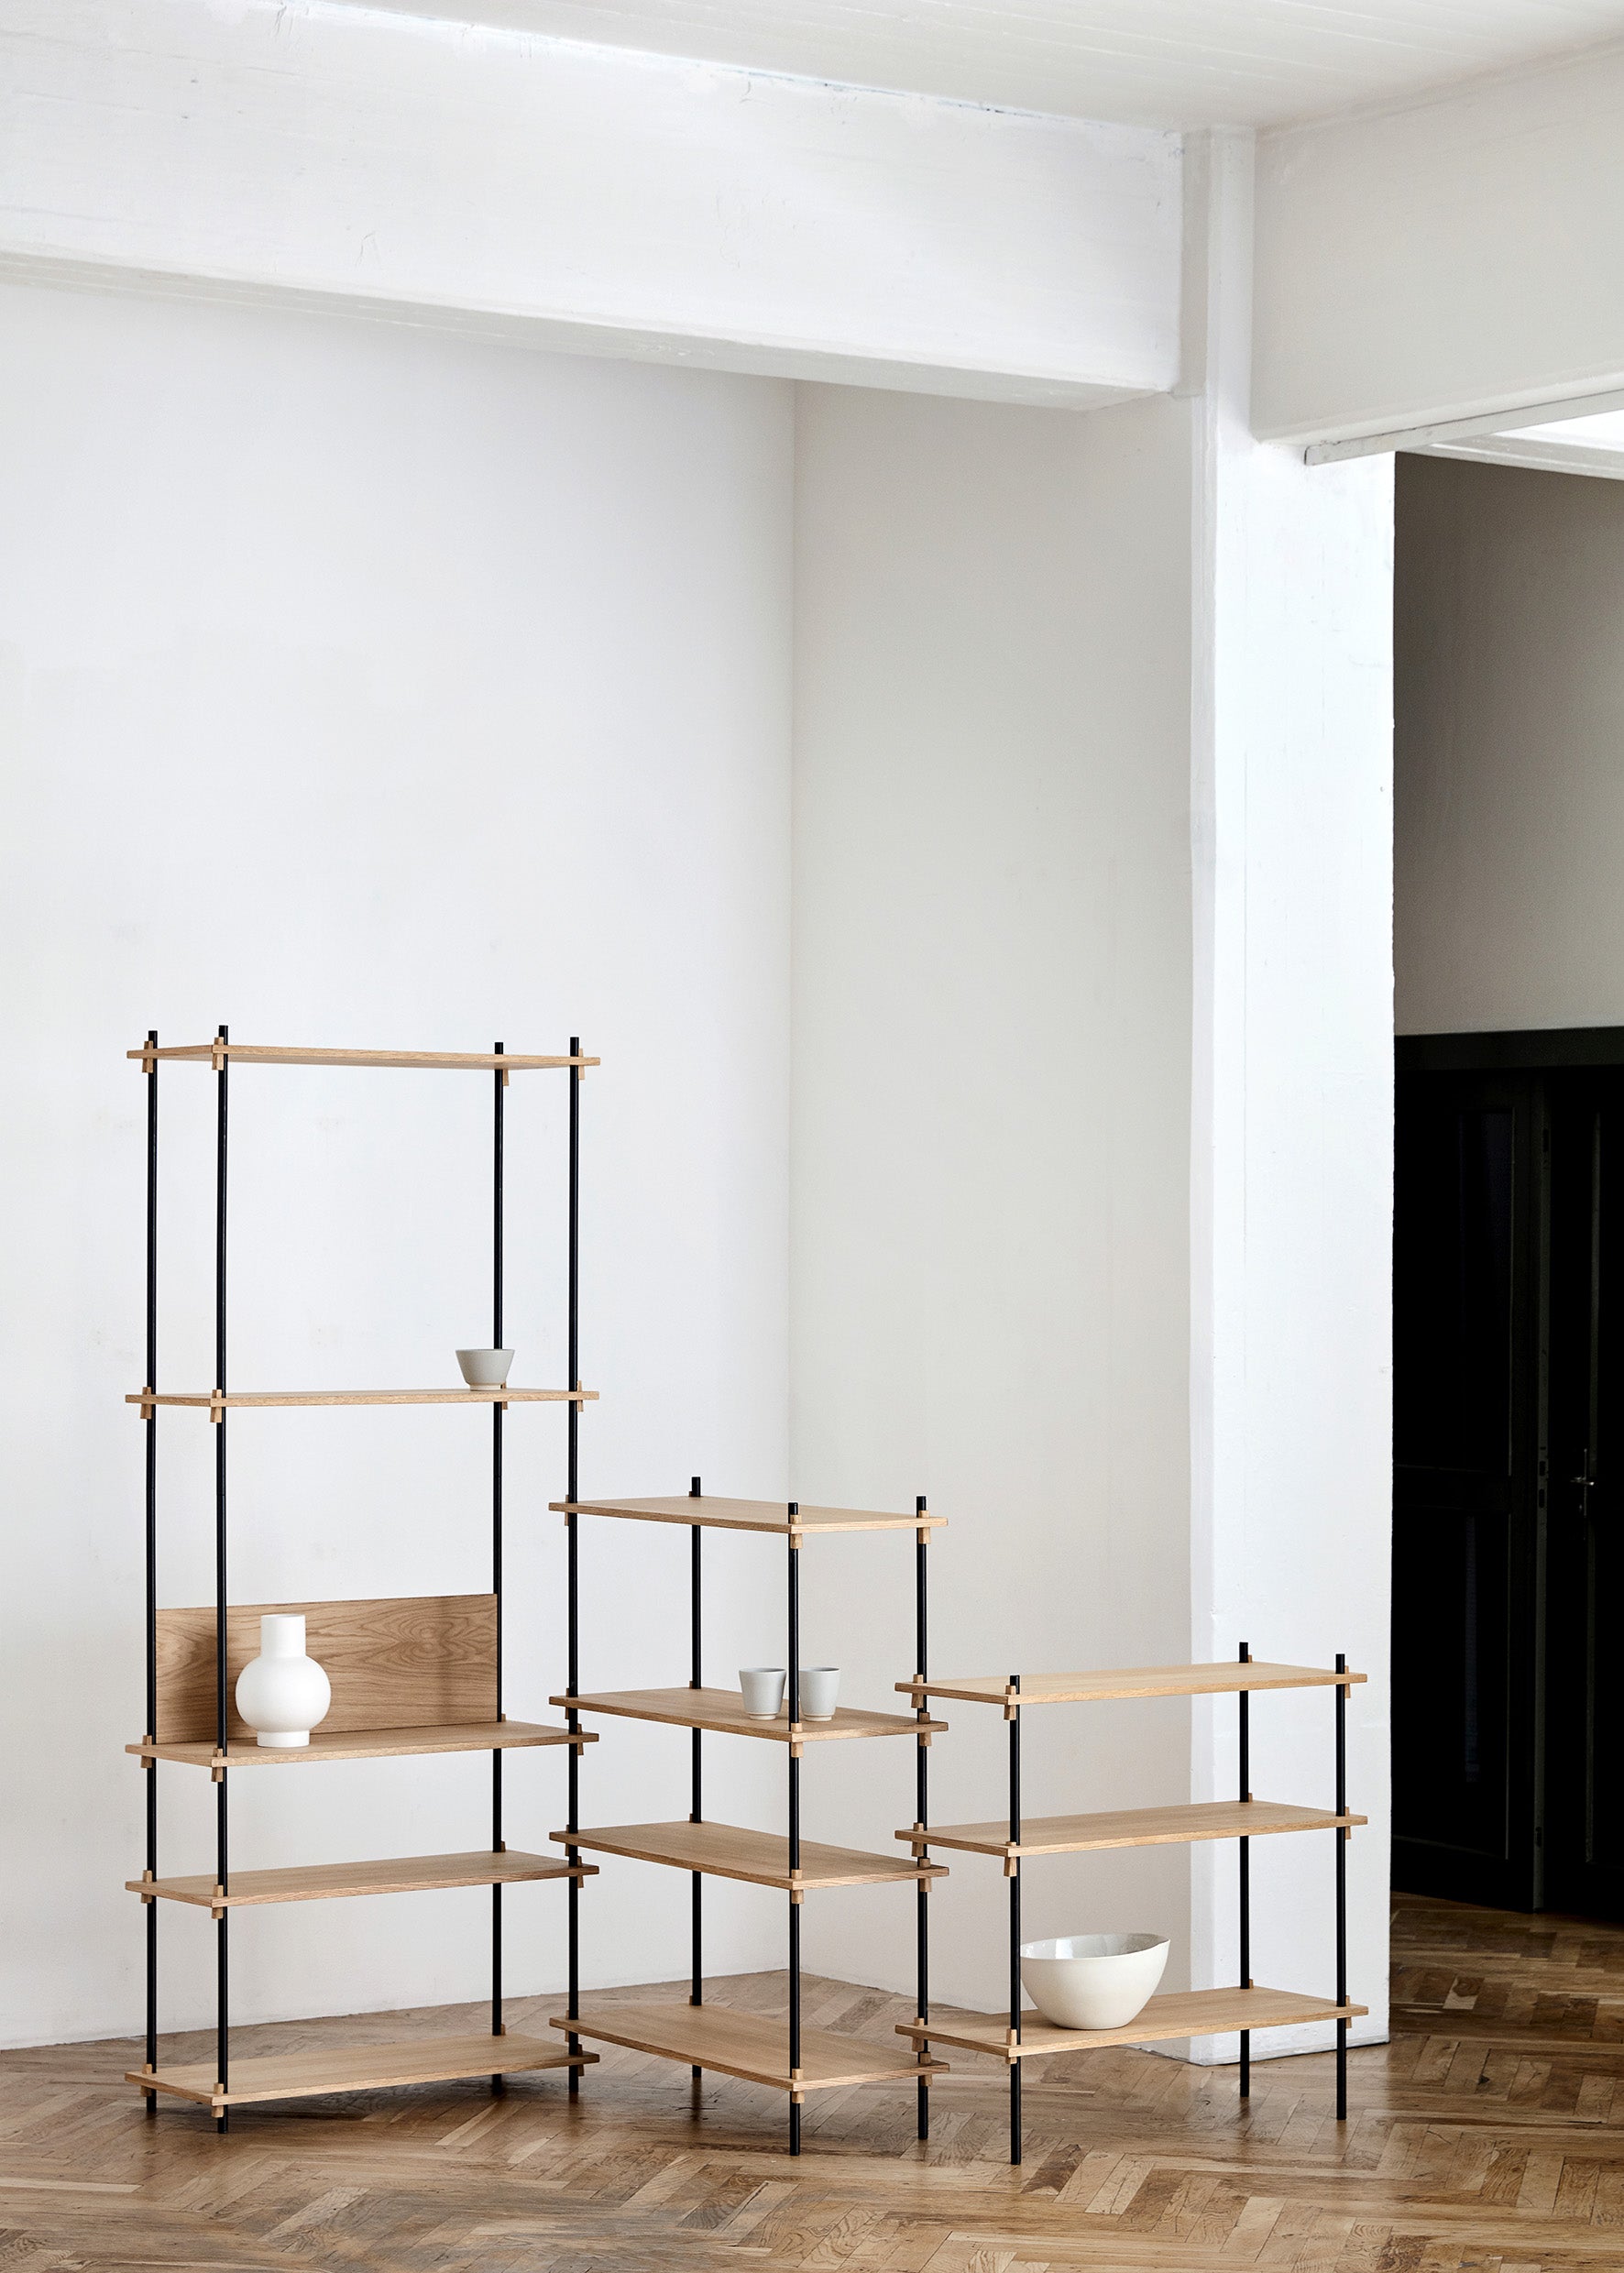
Build as tall as you like
Legs are available in three sizes: 65 cm, 85 cm and 115 cm. Both legs can be attached together in any combination. The only limitation is the height of your space.

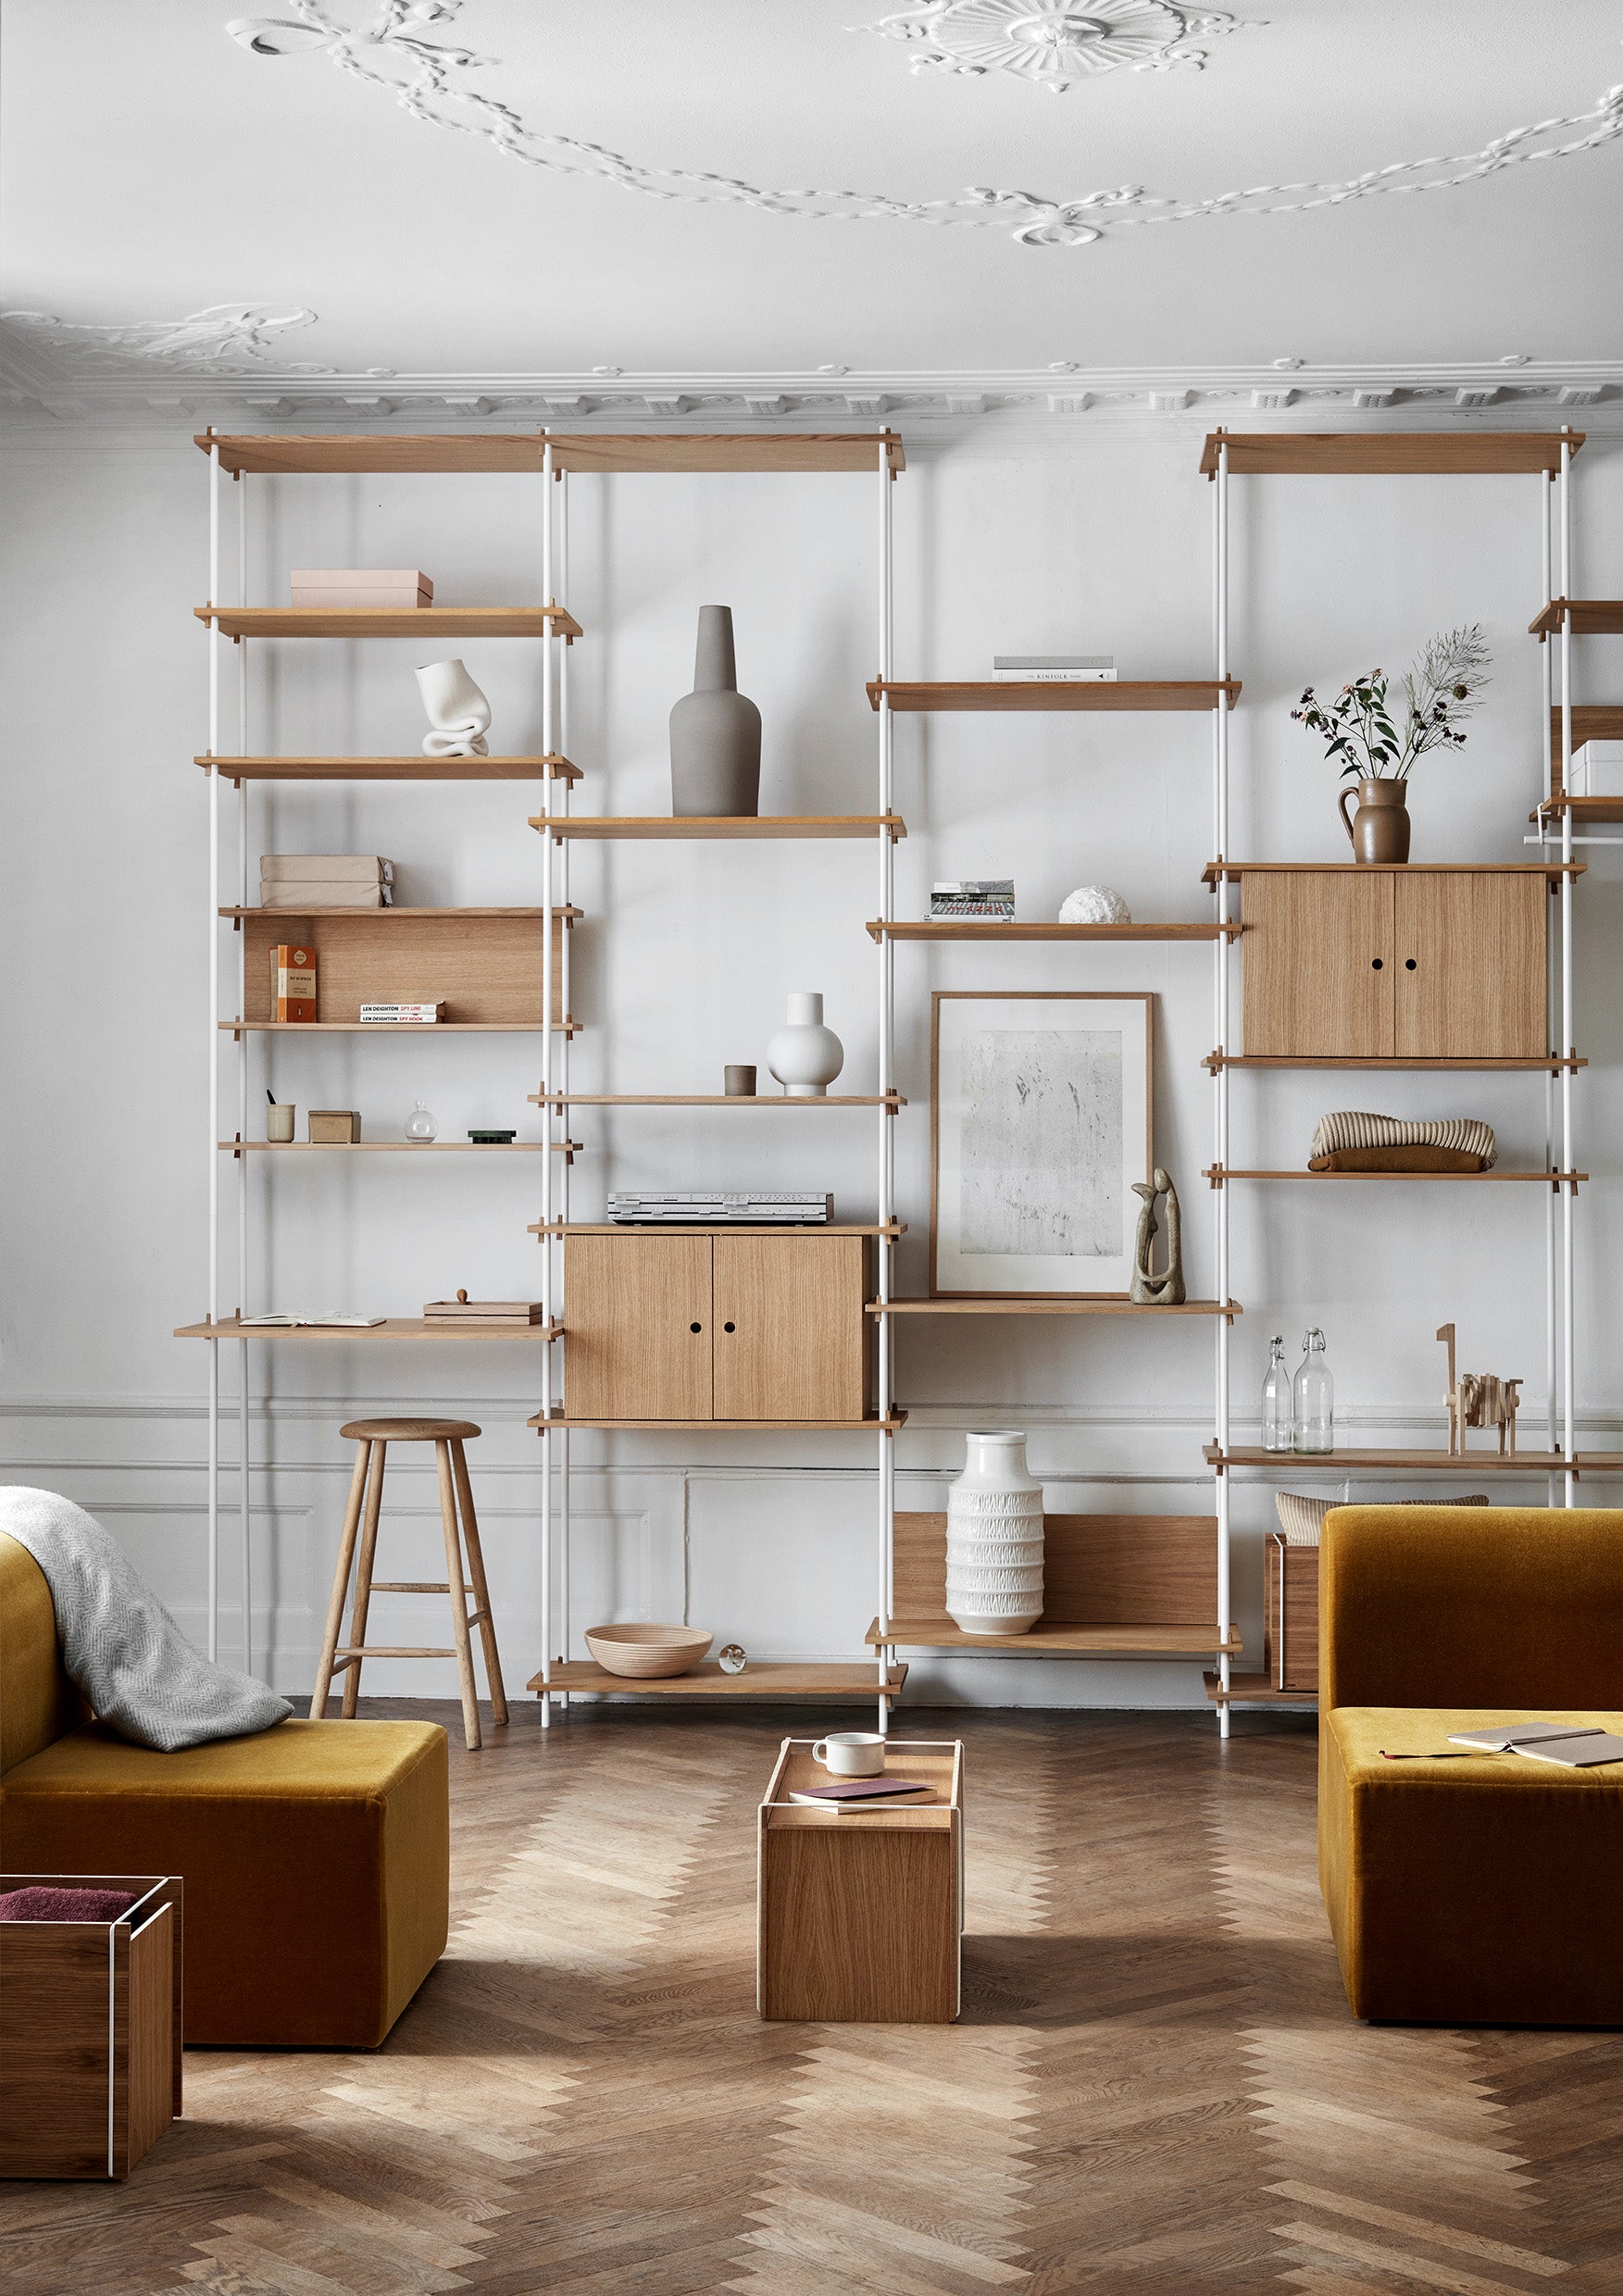
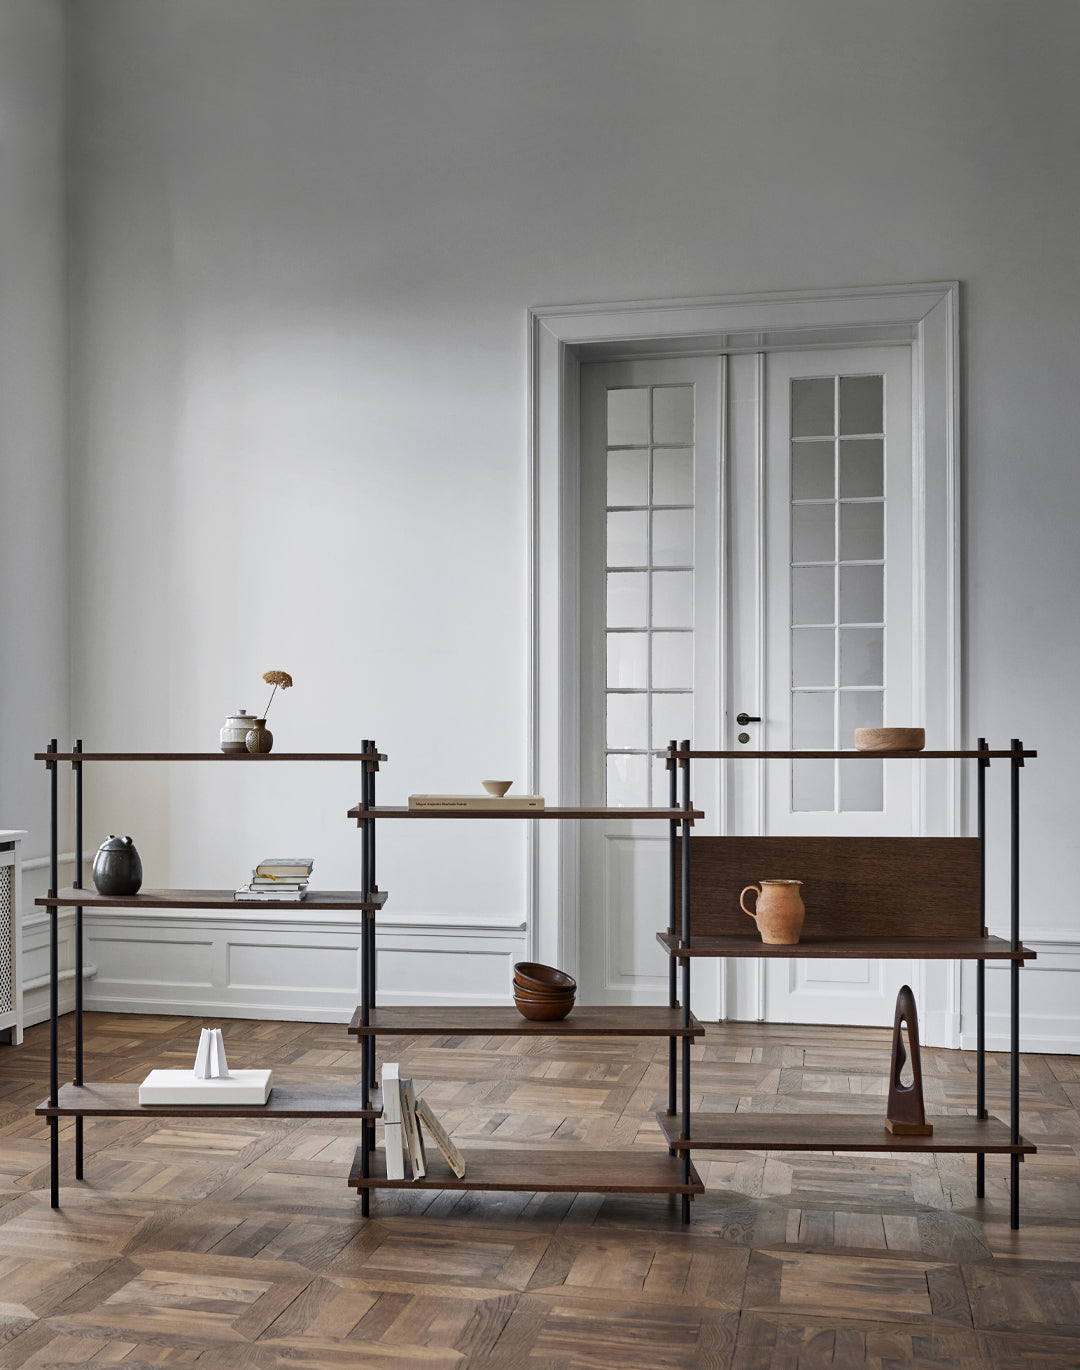
Build as wide as you like
Simply keep adding leg sets and shelves in whichever direction you want to go. One bay measures 85 cm. Because of the overlap each additional bay will add 77 cm to the length.

Rotate to any angle
Add a new bay at any angle, simply pivot around a shared leg. Instantly creating a room divider or bending around a corner.

Navigate different levels
Be it up a set of stairs or simply navigating an uneven floor. Each leg can be adjusted in height independently, allowing you to easily deal with tricky uneven surfaces.

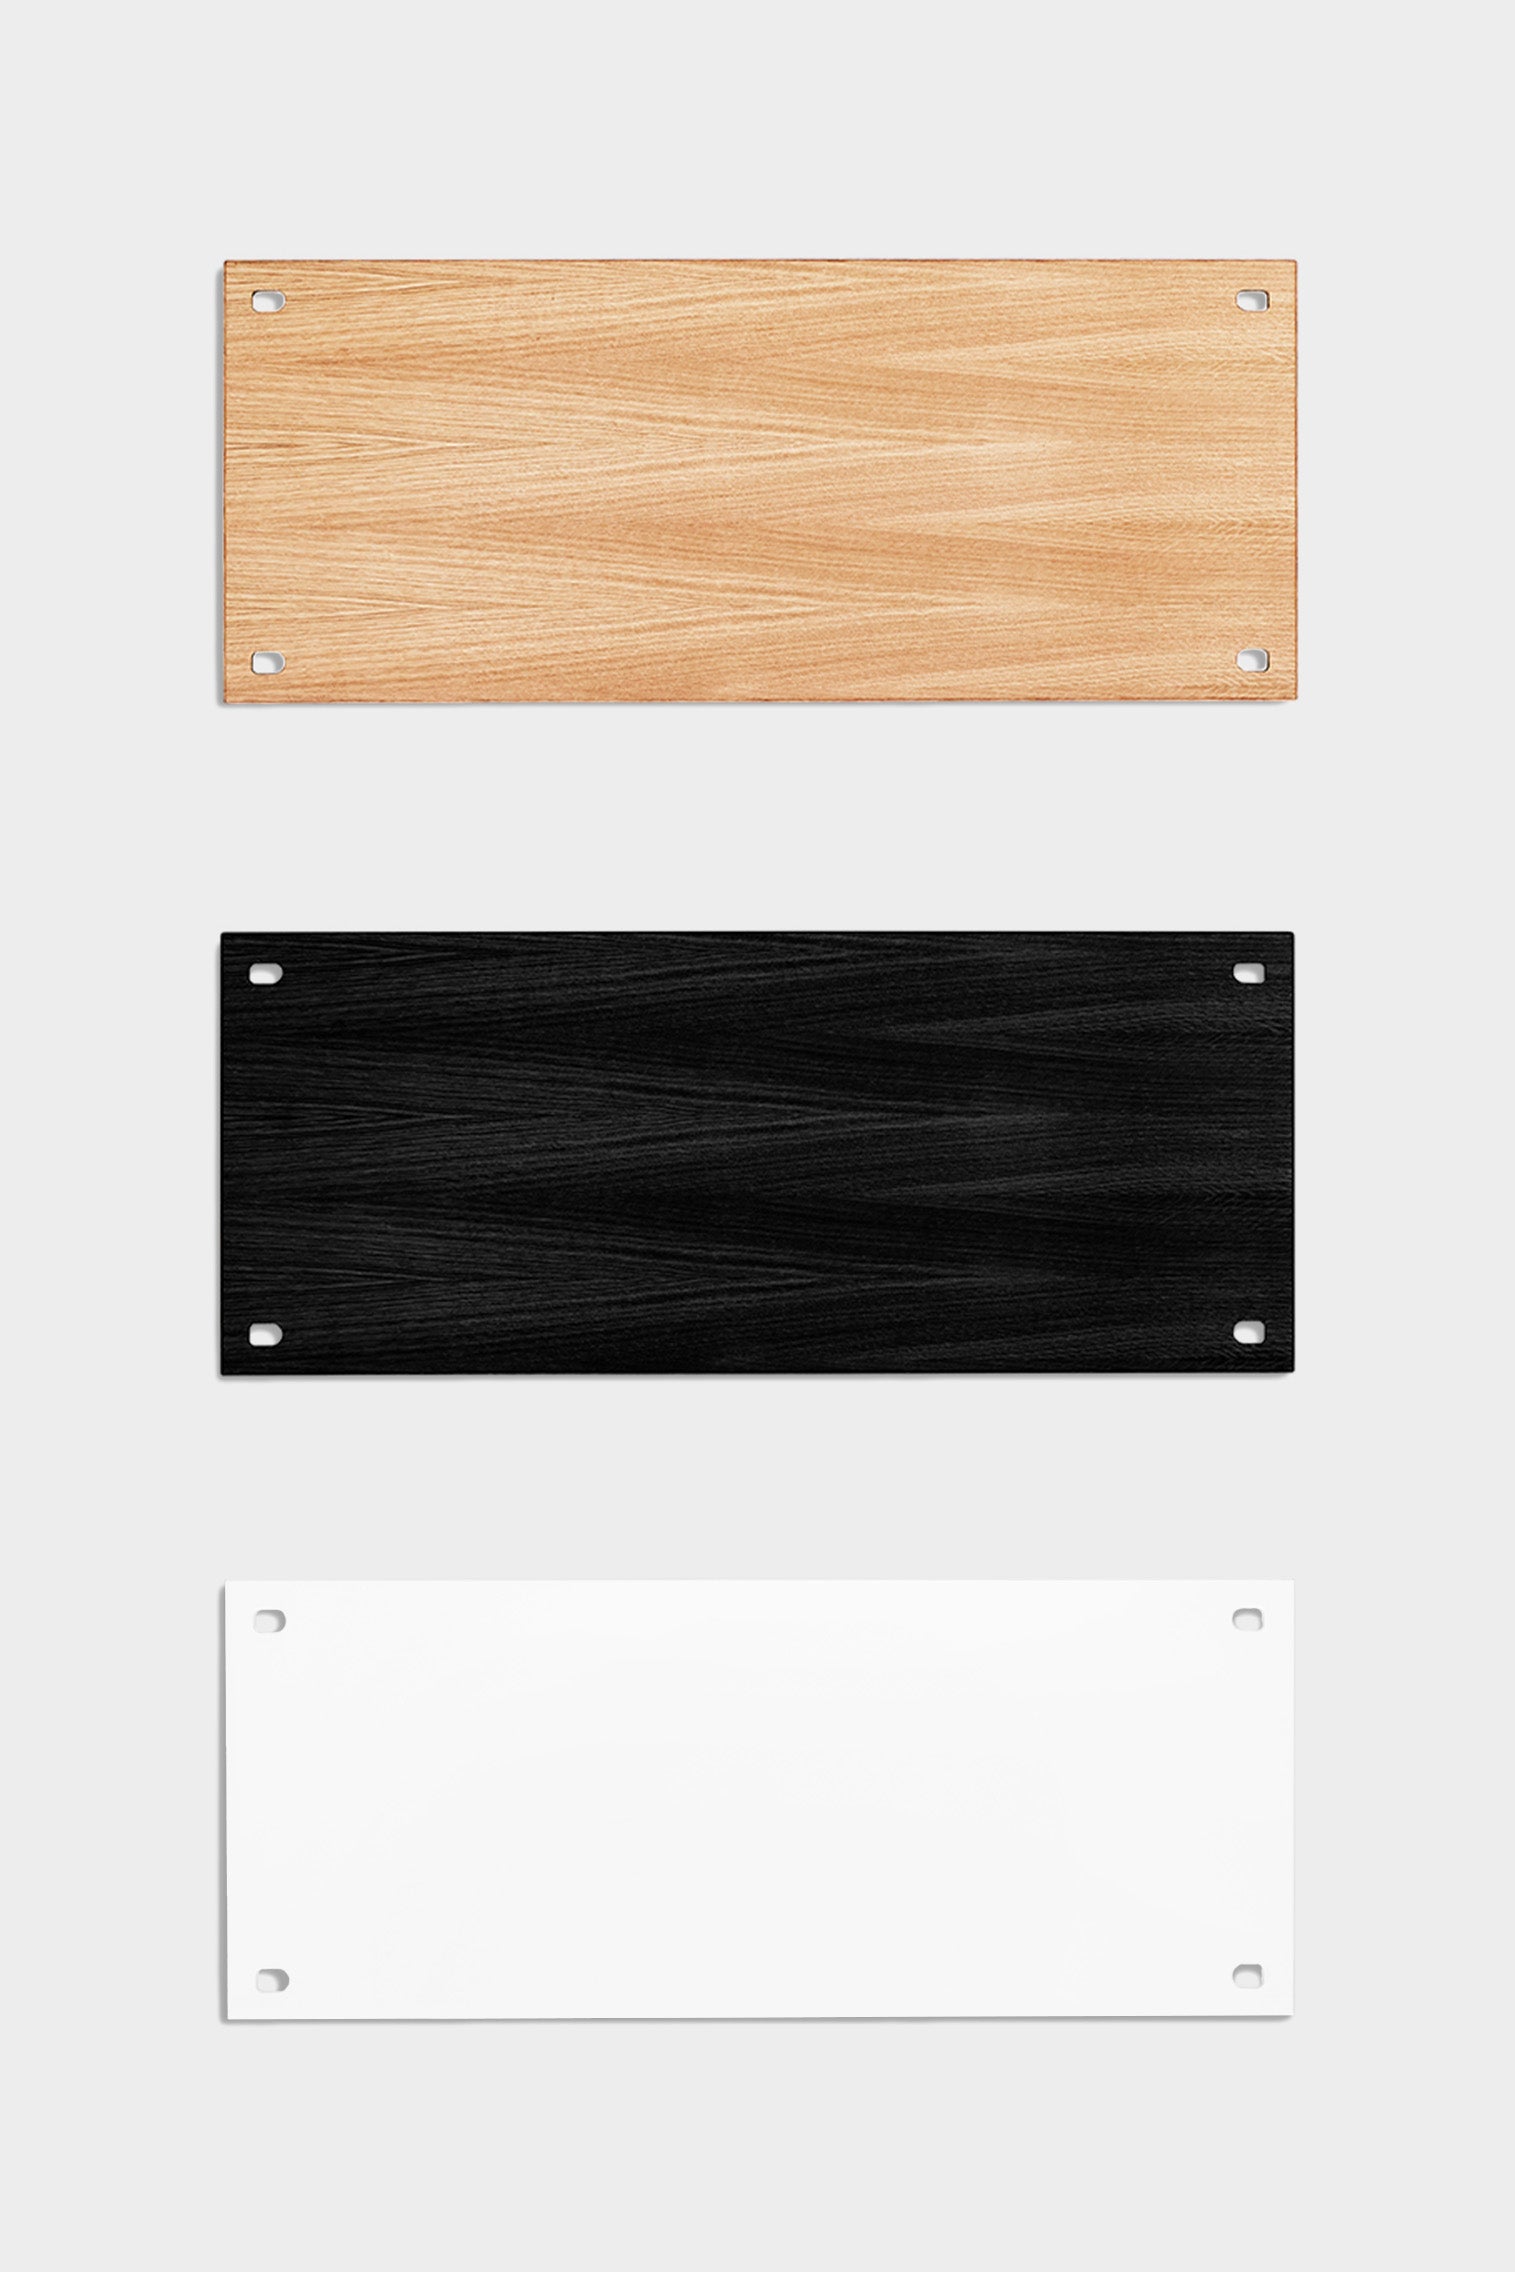
Material and finishes
Choose your finish in either:
1. Oiled oak
2. Black stained oak
3. White PU paint
4. Smoked oak
All legs and metal work are available in either a black or white finish.

Secure to the wall
When building a system against a wall we always recommend to secure it in place. Each system is supplied with at least two security clips, which you slide onto a leg and screw directly into the wall behind.

Build free standing
Should you want to build a free-standing system that is higher than 85 cm, we recommend that you either build a back-to-back system or make a 90-degree angle after every third bay.
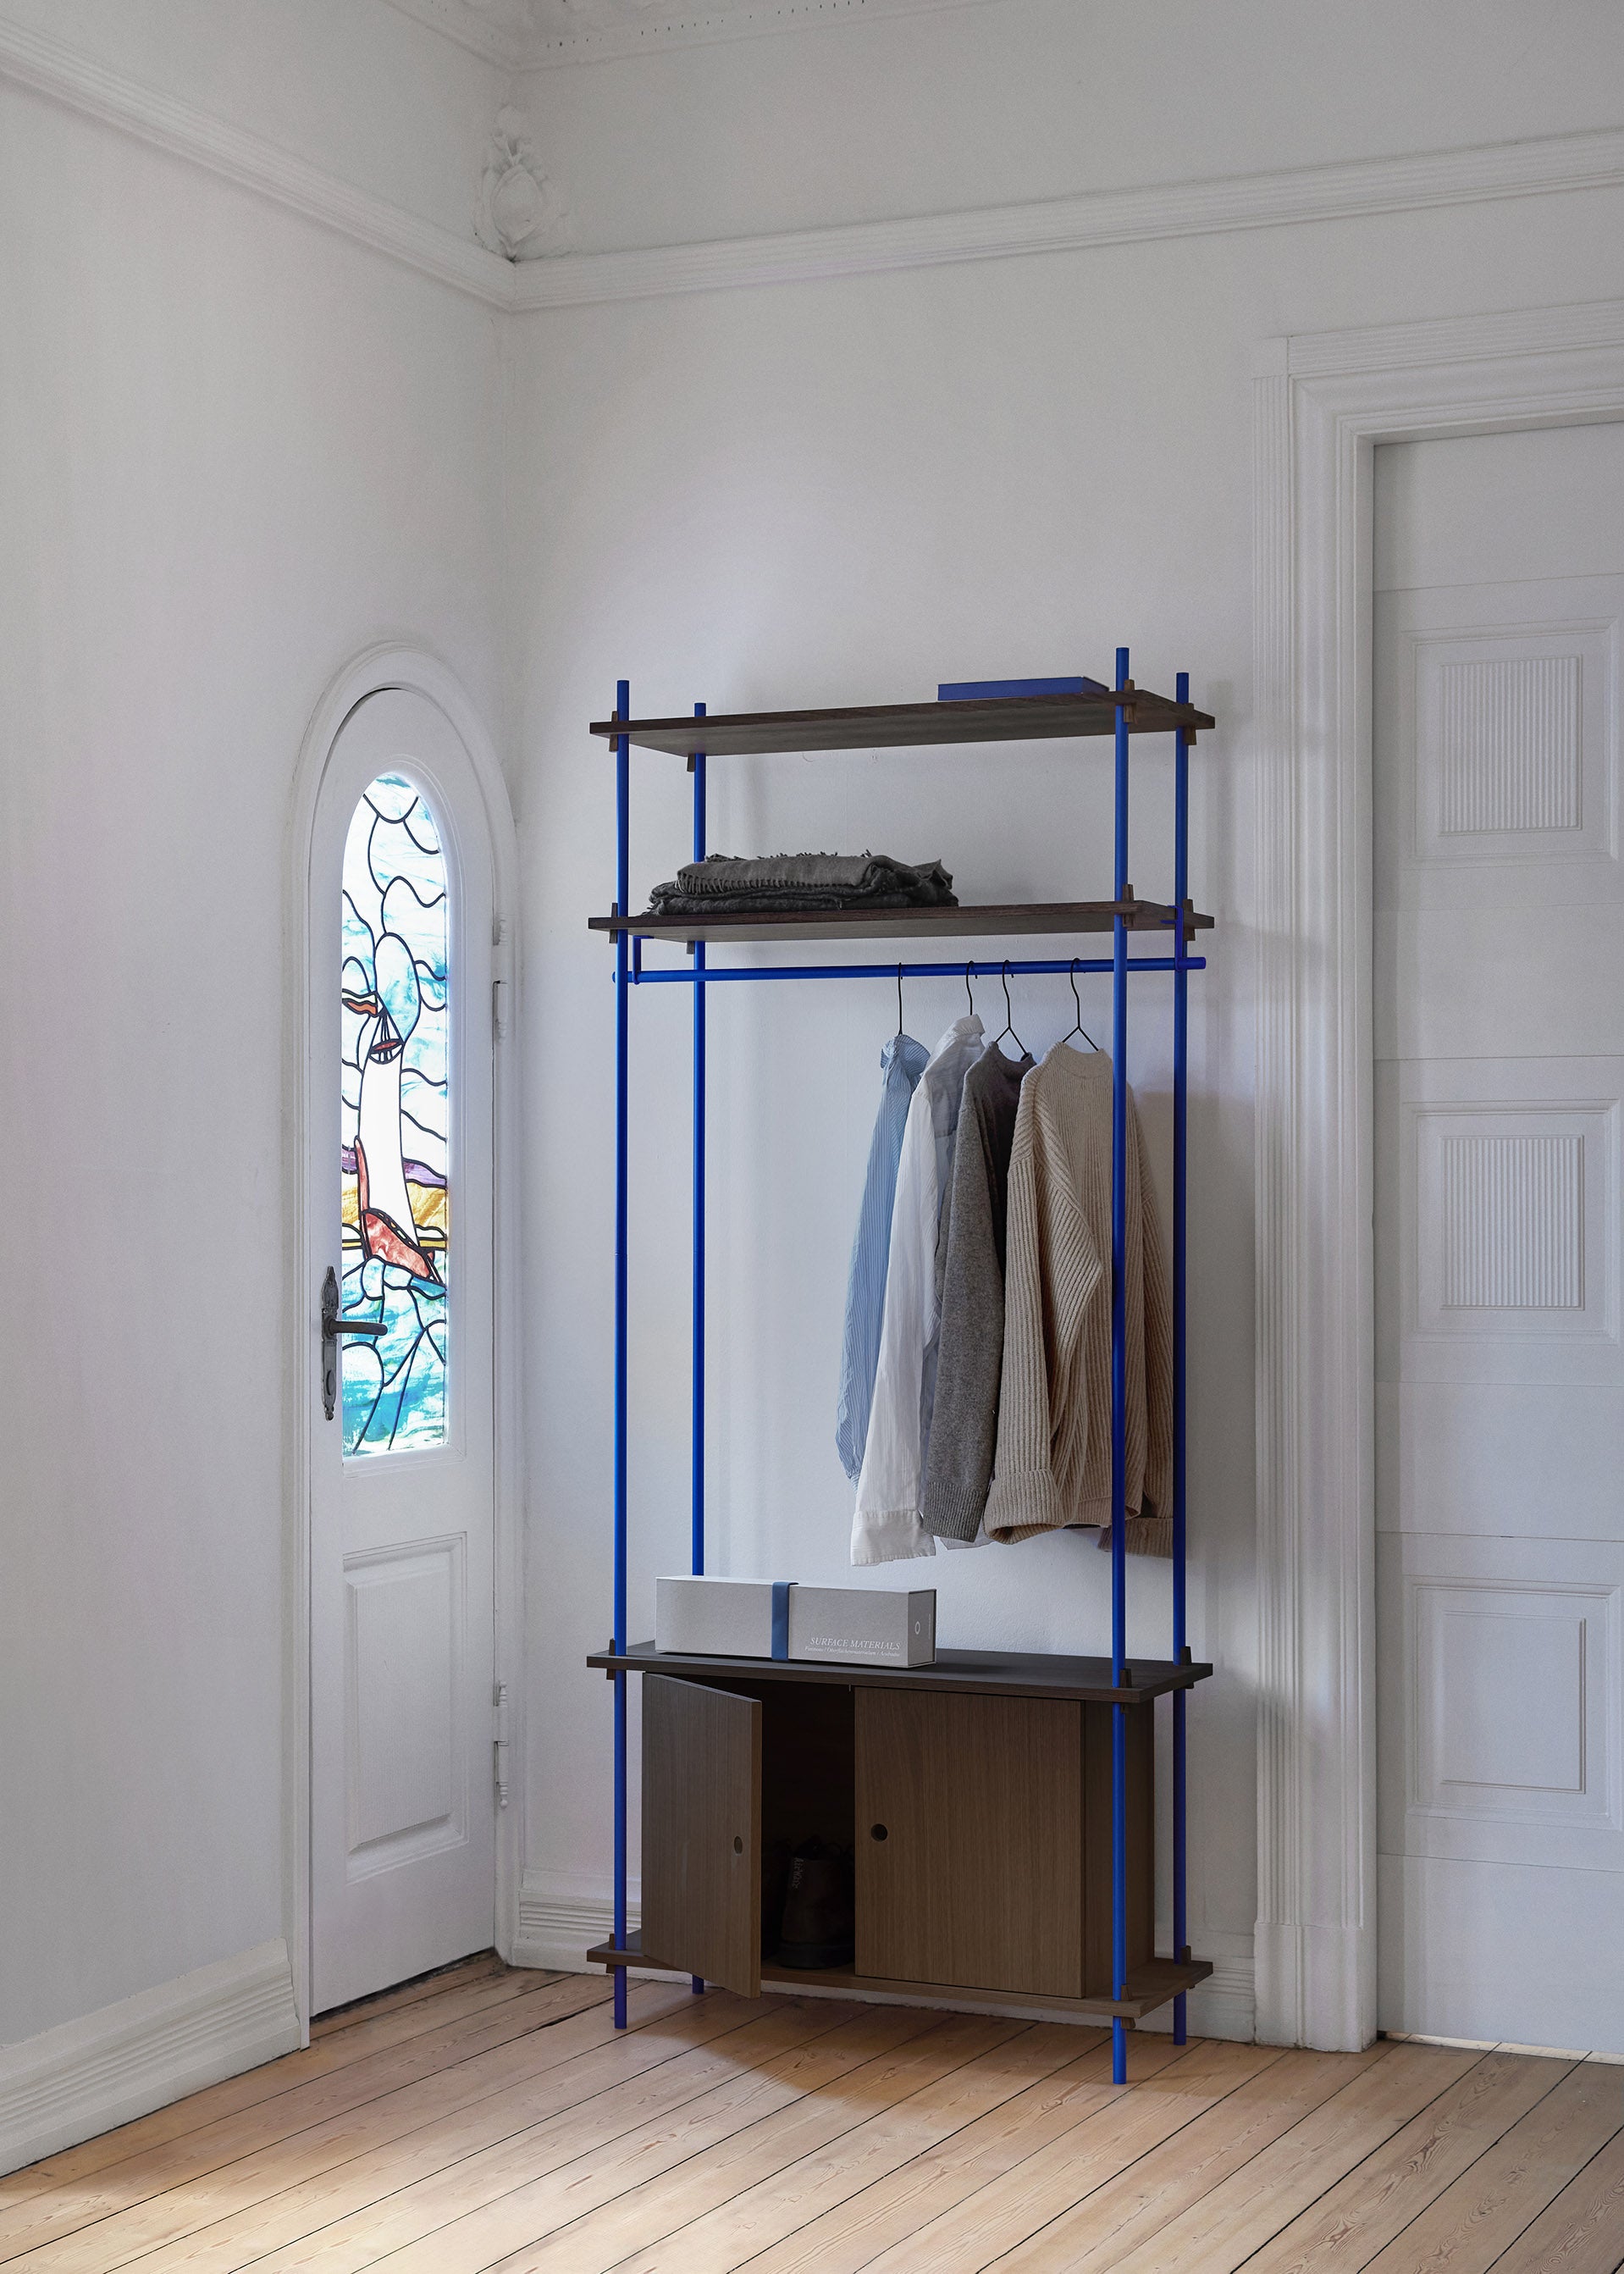
Add a function / Clothes Bar
With the CLOTHES BAR, you can easily turn your shelving system into a wardrobe perfect for the bedroom or hallway. The clothes bar simply grips onto the edge of the shelf.
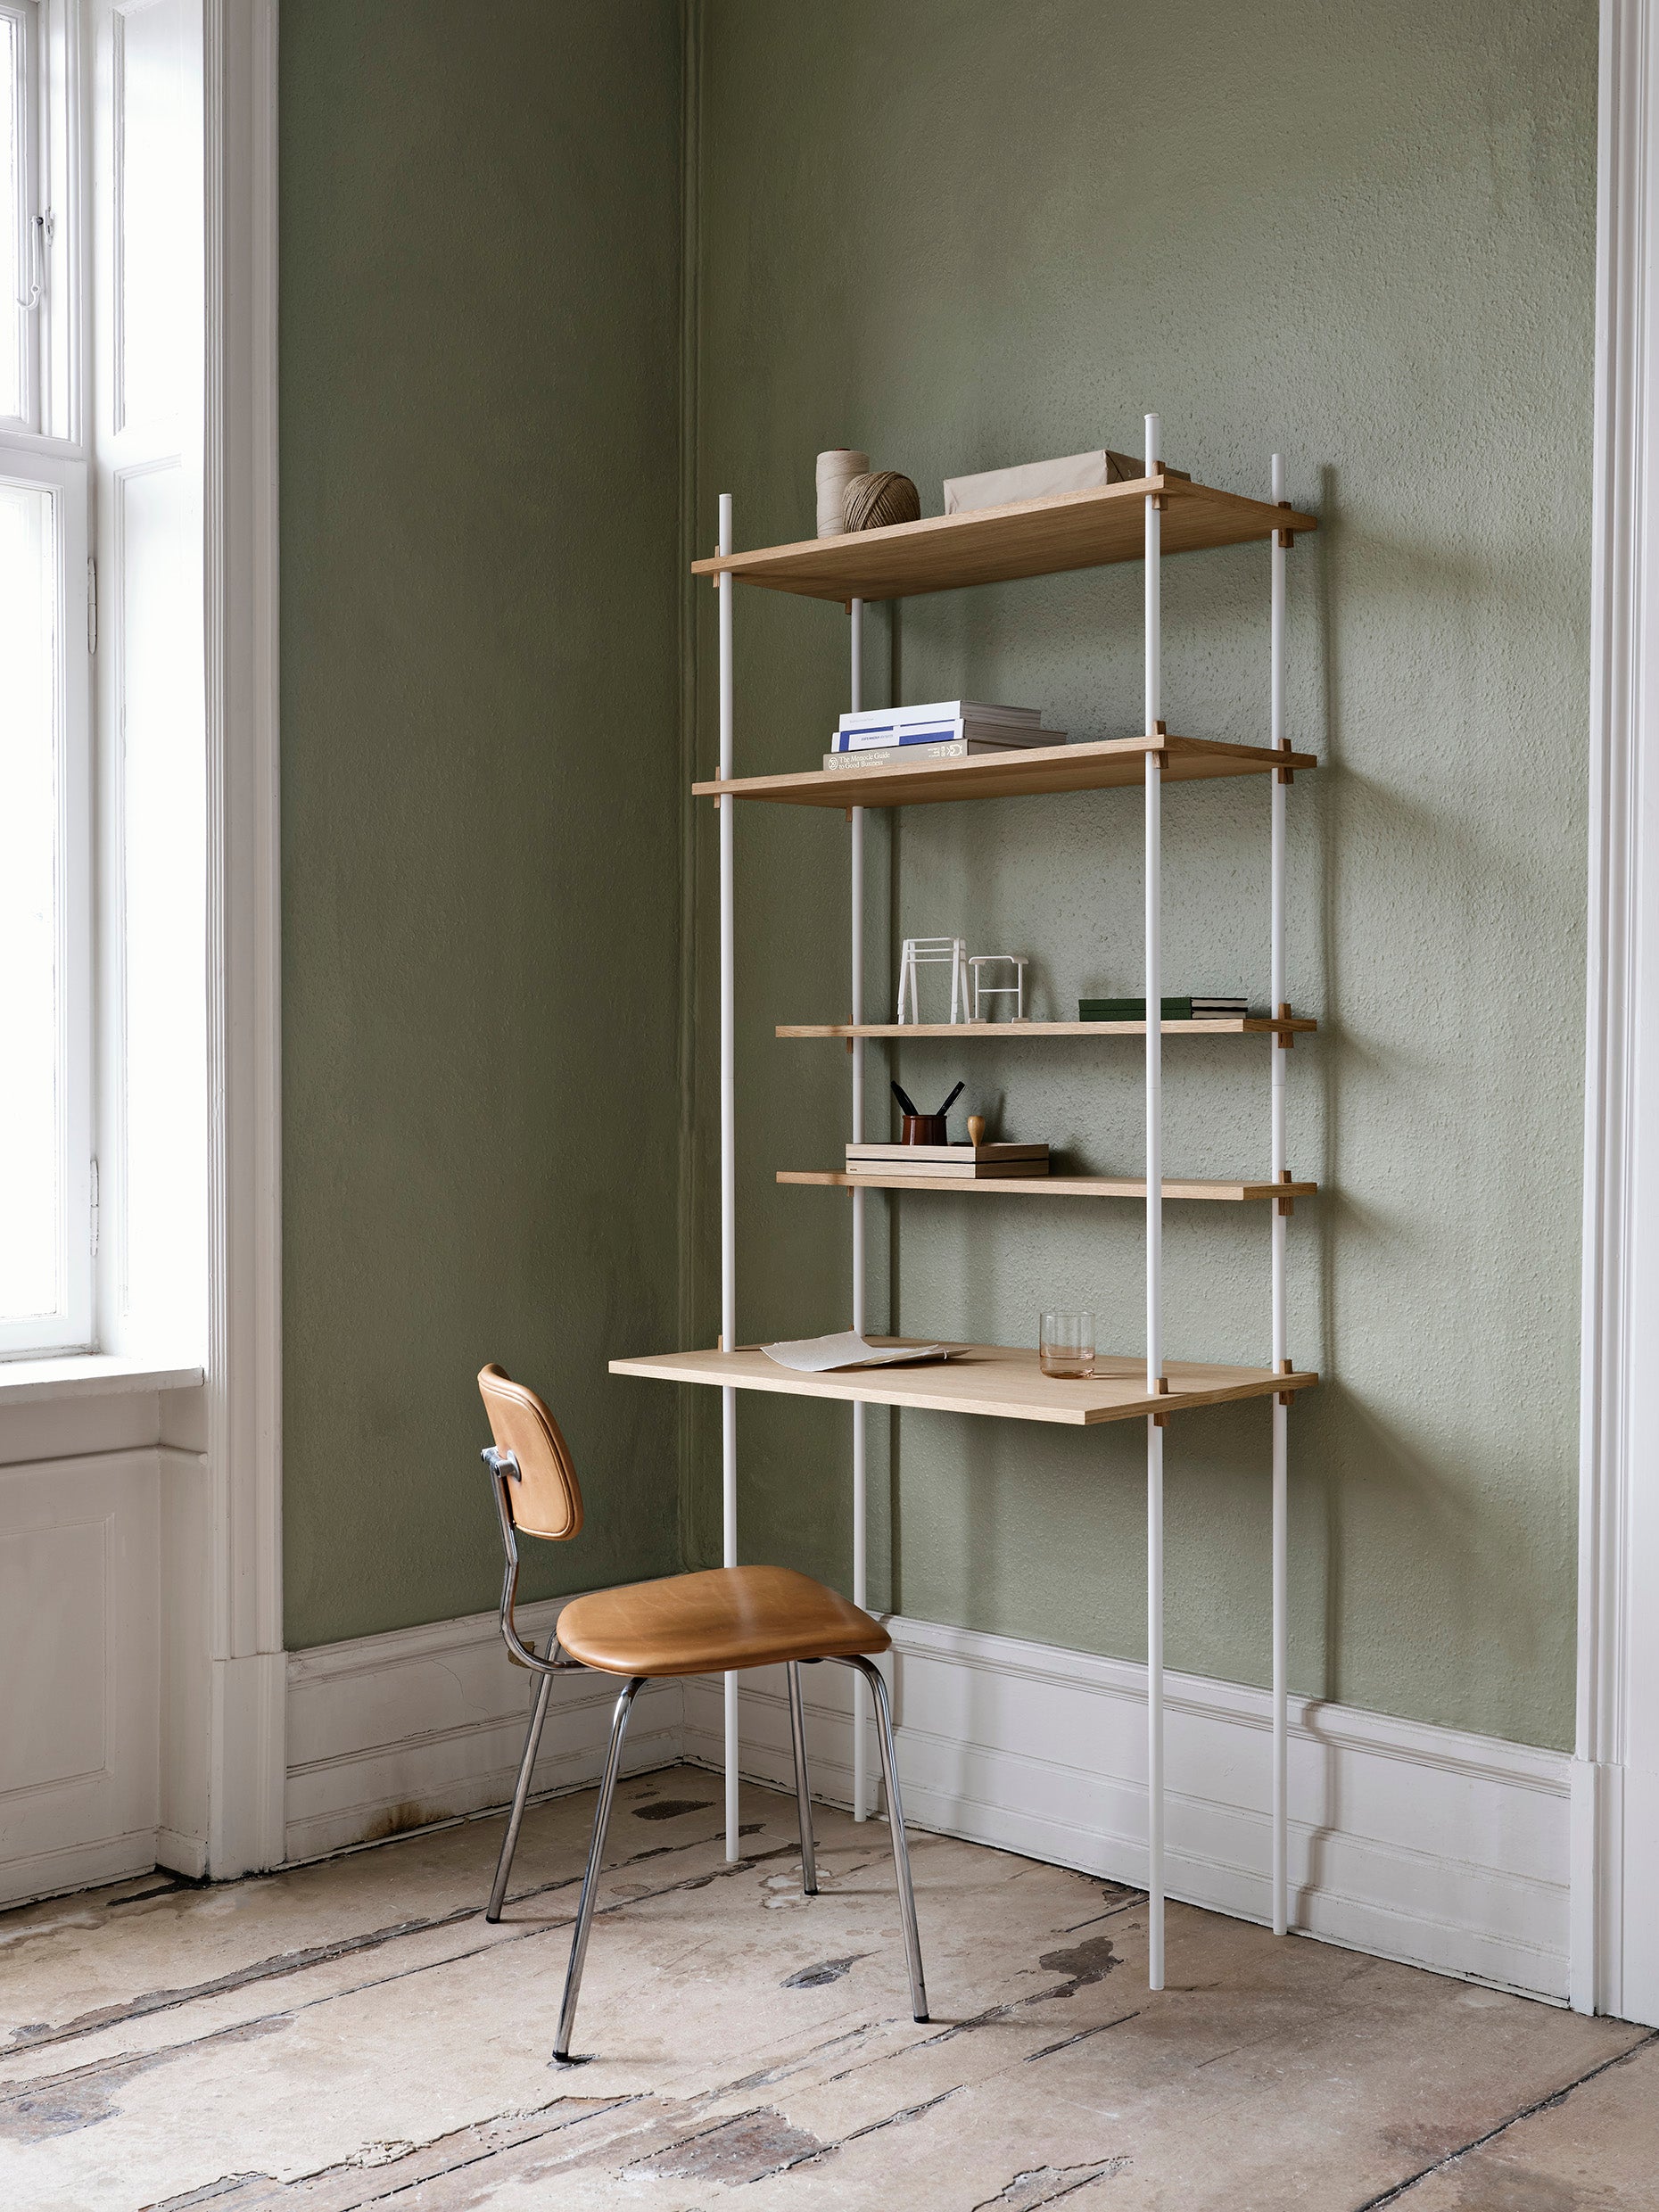
Add a function / Desk
The DESK allows you to combine storage and display space with a small office space. The desk is simply replaced by one of the shelves, and can, therefore be placed at any given height.
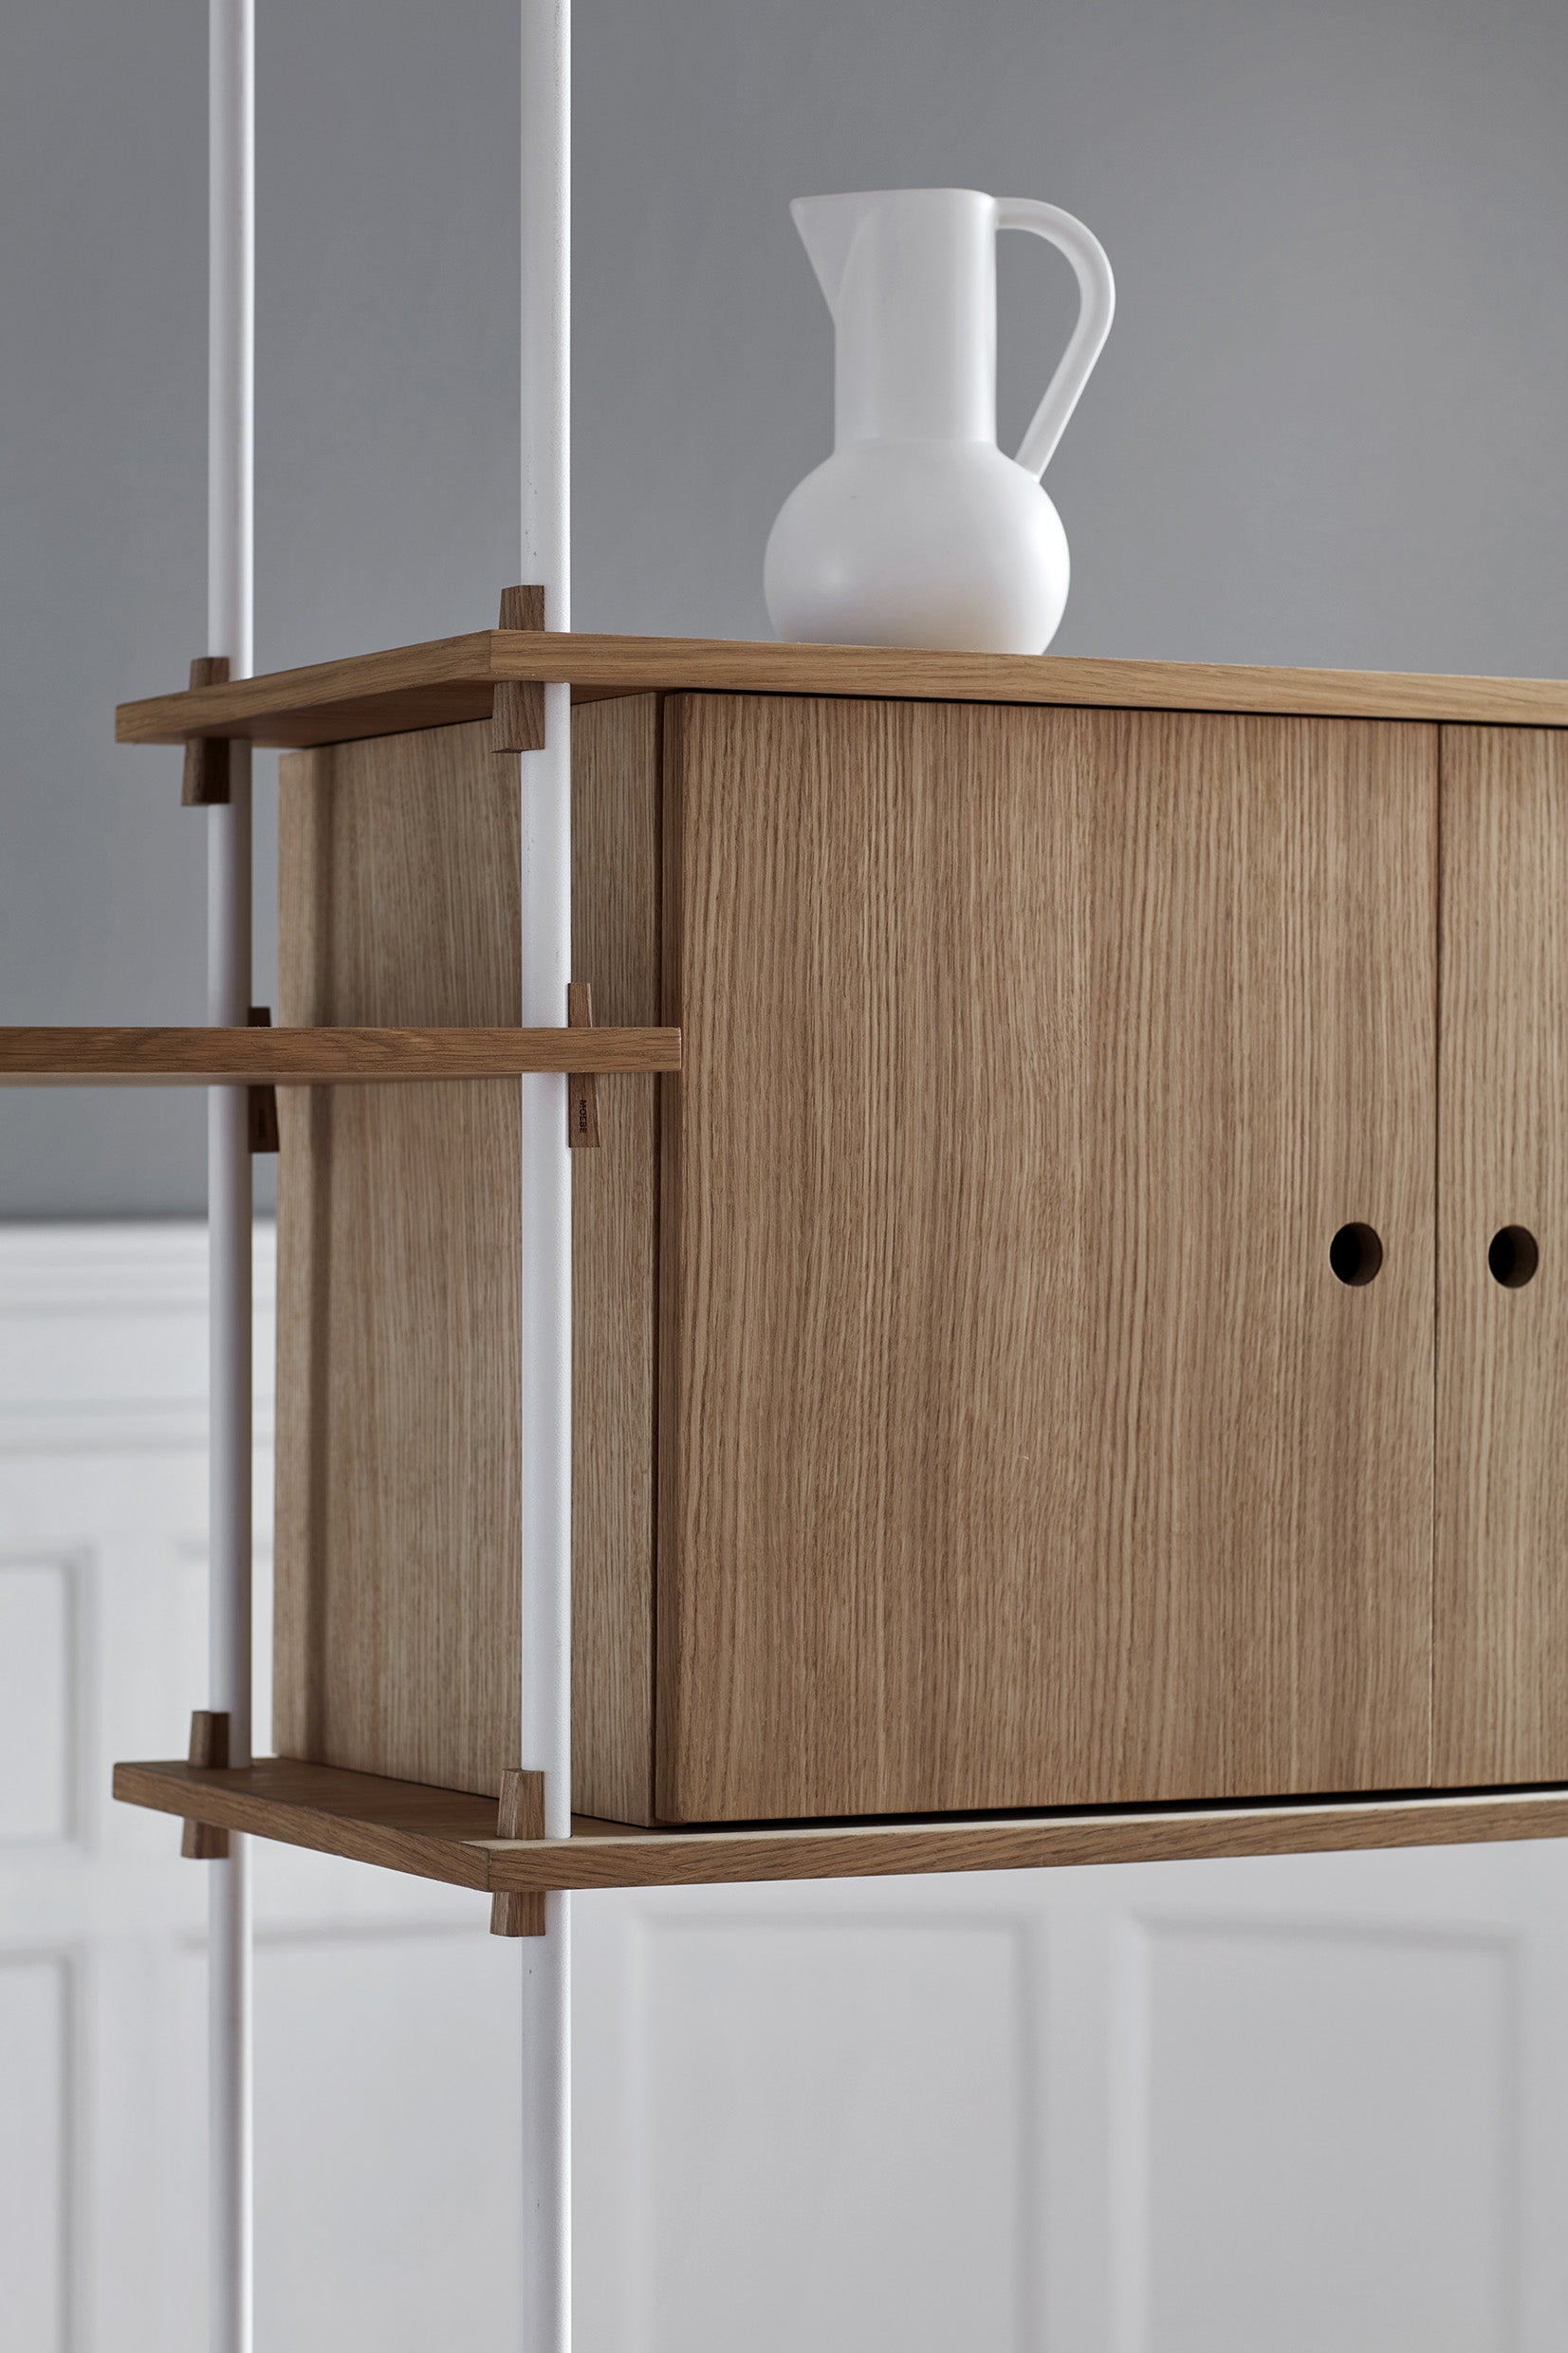
Add a function / Cabinet
The CABINET can be placed at any height within the system, and still allows for the shelves to be placed at either side. The cabinet comes flat packed and consist of 2 custom shelves, 2 side panels, a back plate and doors. With an internal shelf available as an extra piece.


CARE AND FAQ
How deep are the shelves?
The shelves are 17.5 cm deep.
Is it glued or screwed?
No, it is just held by the wedges.
Do I need to fix it to a wall?
Yes. Wall Shelving System comes included with fixing brackets. These should be installed at the top, bottom and at every leg interval.
How do I know that the shelf is straight?
By using a water level, a water level app or measuring the distance between the shelves.
How much weight can it stand?
We do not recommend more than 10 kg on each shelf.
Does the wood change colour?
Direct sunlight will cause the colour of wood to change, even if it is stained or lacquered. This will be particularly apparent if the furniture is placed under eg. a window. Oak will tend to darken in this situation.
What are the shelves made of?
The wedges are made from solid oak and the shelves are made from an MDF core with either an oiled or black-stained oak finish or a white PU paint.
Where is it produced?
In Lithuania.
How high and wide can it be built?
You can build the system as high and wide as you like. There are no limitations.
What colours does it come in?
Shelves - Oiled oak Veneer / Black stained oak veneer / White PU paint
Legs - Powder coated in black or white
What if I lose a part?
If you lose a part, e.g. a wedge, you can always get hold of our replacement part from the spare parts section of our website.
How do I remove stains from e.g. a cup?
Light stains may be removed by gently rubbing in the direction of the grain with 400 grit (very fine) sandpaper and re-oiling afterward.
How do I clean the Shelving System?
Dust can be removed with damp cloth.
How do I remove dry patches on the surface?
Apply a thin coat of oil to the furniture with a clean lint-free cloth to nourish the wood. Do not use oils sold for cooking or eating.
TAKE CARE OF YOUR SHELVING SYSTEM
When unwrapped it might take 2–3 days for the protective oil to completely dry. Be careful to protect clothing and other materials that can soak up oil during this time.
If at any time the wood displays lighter dry patches, we recommend you apply a thin coat of oil to the furniture with a clean lint-free cloth to nourish the wood. Small cans of pigment free furniture oil are available from most DIY or hardware stores. Do not use oils sold for cooking or eating.
Any spills must be removed immediately using a cloth. Dust can be removed with damp a cloth. Light stains may be removed by gently rubbing in the direction of the grain with 400 grit (very fine) sandpaper and re-oiling afterwards.
If you don't find what you are looking for, don't hesitate to send us an email: info@moebe.dk
CARE AND FAQ
How deep are the shelves?
The shelves are 35 cm deep.
Is it glued or screwed?
No, it is just held by the wedges.
Do I need to fix it to a wall?
We do not recommend to use the Shelving System without securing it to the wall. If doing so please beware that it is your responsibility to make sure, that it is constructed so it will not fall over.
How do I know when it's straight?
By using a water level, a water level app or measuring the distance between the shelves.
How much weight can it stand?
We do not recommend more than 20 kg on each shelf. If you have a backplate below the shelf the recommended limit is 30 kg.
Does the wood change colour?
Direct sunlight will cause the colour of real wood to change, even if it is stained or lacquered. This will be particularly apparent if the furniture is placed under eg. a window. Oak will tend to darken in this situation.
Can I buy different parts?
Yes, you can buy all parts separately and design your shelving system how ever you like.
What are the shelves made of?
The wedges are made from solid oak and the shelves are made from an MDF core with either an oiled or black-stained oak finish or a white PU paint.
Where is it produced?
In Lithuania.
How high and wide can it be built?
You can build the system as high and wide as you like. There are no limitations.
What colours does it come in?
Shelves - Oiled oak Veneer / Black stained oak veneer / White PU paint
Legs - Powder coated in black or white
What if I lose a part?
If you lose a part, e.g. a wedge, you can always email us to get a new specific part.
How do I remove stains from e.g. a cup?
Light stains may be removed by gently rubbing in the direction of the grain with 400 grit (very fine) sandpaper and re-oiling afterward.
How do I clean the Shelving System?
Dust can be removed with damp cloth.
How do I remove dry patches on the surface?
Apply a thin coat of oil to the furniture with a clean lint-free cloth to nourish the wood. Do not use oils sold for cooking or eating.
TAKE CARE OF YOUR SHELVING SYSTEM
When unwrapped it might take 2–3 days for the protective oil to completely dry. Be careful to protect clothing and other materials that can soak up oil during this time.
If at any time the wood displays lighter dry patches, we recommend you apply a thin coat of oil to the furniture with a clean lint-free cloth to nourish the wood. Small cans of pigment free furniture oil are available from most DIY or hardware stores. Do not use oils sold for cooking or eating.
Any spills must be removed immediately using a cloth. Dust can be removed with damp a cloth. Light stains may be removed by gently rubbing in the direction of the grain with 400 grit (very fine) sandpaper and re-oiling afterwards.
If you don't find what you are looking for, don't hesitate to send us an email: info@moebe.dk


How to delete a part
1. Select the part that you want to remove by clicking on it.
2. Once selected. Click on the recycle bin image located at the bottom right of the model screen. The part should now be removed.
How to delete a part
1. Select the part that you want to remove by clicking on it.
2. Once selected. Click on the recycle bin image located at the bottom right of the model screen. The part should now be removed.
How to delete a part
1. Select the part that you want to remove by clicking on it.
2. Once selected. Click on the recycle bin image located at the bottom right of the model screen. The part should now be removed.
How to delete a part
1. Select the part that you want to remove by clicking on it.
2. Once selected. Click on the recycle bin image located at the bottom right of the model screen. The part should now be removed.
How to delete a part
1. Select the part that you want to remove by clicking on it.
2. Once selected. Click on the recycle bin image located at the bottom right of the model screen. The part should now be removed.
How to delete a part
1. Select the part that you want to remove by clicking on it.
2. Once selected. Click on the recycle bin image located at the bottom right of the model screen. The part should now be removed.
How to rotate a bay
Bays can only be rotated when adding a new bay to the system. Select a ''corner extension '' right or left.
How to rotate a bay
Bays can only be rotated when adding a new bay to the system. Select a ''corner extension '' right or left.
How to rotate a bay
Bays can only be rotated when adding a new bay to the system. Select a ''corner extension '' right or left.
How to share your system
1. First. Click on the Share button located at the top right of the modelling space. The symbol looks like this:
2. In the sharing dialogue box. Copy the share link and keep this somewhere safe. Your design can be accessed by anyone who has the share link.
How to share your system
1. First. Click on the Share button located at the top right of the modelling space. The symbol looks like this:
2. In the sharing dialogue box. Copy the share link and keep this somewhere safe. Your design can be accessed by anyone who has the share link.
How to share your system
1. First. Click on the Share button located at the top right of the modelling space. The symbol looks like this:
2. In the sharing dialogue box. Copy the share link and keep this somewhere safe. Your design can be accessed by anyone who has the share link.
How to print your system to a PDF
1. First. Click on the price button, located at the bottom of your model.
2. In the newly opened dialogue box, locate the print button at the bottom left-hand side, and click once.
3. In the print dialogue box, select ''PDF'' as your printer type
Don't have a pdf printer? How to install:
Windows
https://www.youtube.com/watch?v=qe34HJpXdEg
Mac
https://www.digitaltrends.com/computing/how-to-print-pdf-on-a-mac/
Change the colour / finish
Entire system
1. Ensure that nothing in the model is selected.
2. On the right-hand side, under ''material'' choose and click once on either the oak or black finish.
Individual part
1. Select the part you wish to change.
2. On the right-hand side, under ''material'' choose and click once on either the oak or black finish.
Add a clothes bar
1. First, click the ''add on'' button in the modelling space.
2. To the right-hand side will appear a list of add on's available. Scroll to or click on the ''shelf elements'' section and locate the clothes bar.
3. Click once on the clothes bar to select it. Then, choose one of the newly highlighted shelves within the modelling space to attach the clothes bar. Click once on the location to set the clothes bar in place.
Add an Element
1. First, click the ''Add an element'' button in the modelling space.
2. To the right-hand side will appear a list of add on's available. Classified under Shelves, Cabinet and Other.
3. Click once on the element to select it. Then, choose one of the newly highlighted locations within the modelling space and click on the location to place the element into your model.
Change the height of a bay
1. The height of each bay is controlled individually.
2. First. Click on one of the legs of the bay you wish to change, to the right-hand side will appear a slider.
3, Adjust the slider left or right to adjust the height. If the height you select is not possible the slider will auto adjust to the nearest possible height.
Legs for the shelving system are available in 65cm, 85cm and 115cm in length. Available configurator heights are based on the possible combinations of these three lengths.
Add a new bay
1. First, click the ''Add an element'' button in the modelling space.
2. To the right-hand side will appear a list of add on's available. Locate the ''Extensions'' section and select the type of bay that you want to use.
New bays can be added at a 90° angle, linear or in parallel.
Add a new bay
1. First, click the ''Add an element'' button in the modelling space.
2. To the right-hand side will appear a list of add on's available. Locate the ''Extensions'' section and select the type of bay that you want to use.
New bays can be added at a 90° angle, linear or in parallel.
Add a new bay
1. First, click the ''Add an element'' button in the modelling space.
2. To the right-hand side will appear a list of add on's available. Locate the ''Extensions'' section and select the type of bay that you want to use.
New bays can be added at a 90° angle, linear or in parallel.
Join our mailing list and stay up to date with our latest designs,
stories and all things MOEBE.
by subscribing you accept our privacy policy. You may withdraw your consent or manage your preferences at any time by clicking the unsubscribe link at the bottom of any of our marketing emails, or by emailing us at marketing@moebe.dk
